🤖 Agents SSO
To provide a seamless Single Sign-On (SSO) experience between Docflo Agents and your ERP system, we recommend leveraging your organization's existing Microsoft Entra ID (Azure AD) integration.
How It Works
- The user signs in to Docflo using Microsoft Entra ID.
- Microsoft Entra ID authenticates the user and establishes a browser session.
- When the user connects the ERP through the Agent, Microsoft Entra ID recognizes the existing session.
- Authorization is completed automatically - no additional credentials are required.
- The ERP becomes available within the Agent experience.
With administrator consent configured in advance, users will not see any consent or approval screens.
Required Azure Configuration
Step 1: Create a New App Registration
In the Azure Portal, navigate to App Registrations → New Registration and configure the following:
| Setting | Value |
|---|---|
| Name | Docflo Agent MCP (or a name of your choice) |
| Supported account types | Single tenant |
| Redirect URI type | Web |
| Redirect URI | https://api.docflo.ai/priority-mcp/userAuth/azure/callback |
After creation, note down:
- Directory (Tenant) ID
- Application (Client) ID
Step 2: Create a Client Secret
Navigate to App Registration → Certificates & Secrets → New Client Secret and configure:
| Setting | Value |
|---|---|
| Description | docflo-agent-mcp |
| Expiration | 24 months |
Azure displays the Client Secret Value only once at creation time. Copy and store it securely before leaving the page.
Step 3: Grant Access to the ERP Application
Navigate to App Registration → API Permissions → Add a Permission:
- Select APIs my organization uses
- Locate your ERP application
- Select Delegated Permissions
- Add the
user_impersonationpermission
Step 4: Grant Administrator Consent
Navigate to App Registration → API Permissions and select:
Grant admin consent for [Organization Name]
This step allows users to access the ERP through the Agent integration without being prompted for individual consent.
Administrator consent is strongly recommended. Without it, each user will be prompted to approve access individually on first use.
Step 5: Locate the ERP Application Client ID
From the ERP App Registration in Azure Portal, note down:
- Application (Client) ID
This identifier is required to request delegated access tokens for the ERP on behalf of authenticated users.
Information Required
Please provide the following details to complete the integration setup:
| Item | Required |
|---|---|
| Microsoft Entra ID Tenant ID | ✅ Yes |
| Microsoft Entra ID Domain | ✅ Yes |
| Agent MCP App - Client ID | ✅ Yes |
| Agent MCP App - Client Secret | ✅ Yes |
| ERP Application (Client) ID | ✅ Yes |
| Admin Consent Granted | ⚠️ Recommended |
Expected Result
Once configured:
- ✅ Users authenticate once using Microsoft Entra ID
- ✅ No additional ERP login is required
- ✅ No consent prompts are displayed to end users
- ✅ The Agent can securely access the ERP on behalf of the authenticated user
- ✅ User identity and permissions remain governed by Microsoft Entra ID
Now go to Docflo platform and update the information we collected above in relevant agent (SAP / Priority / NetSuite etc):
- Go to agent Authentication settings
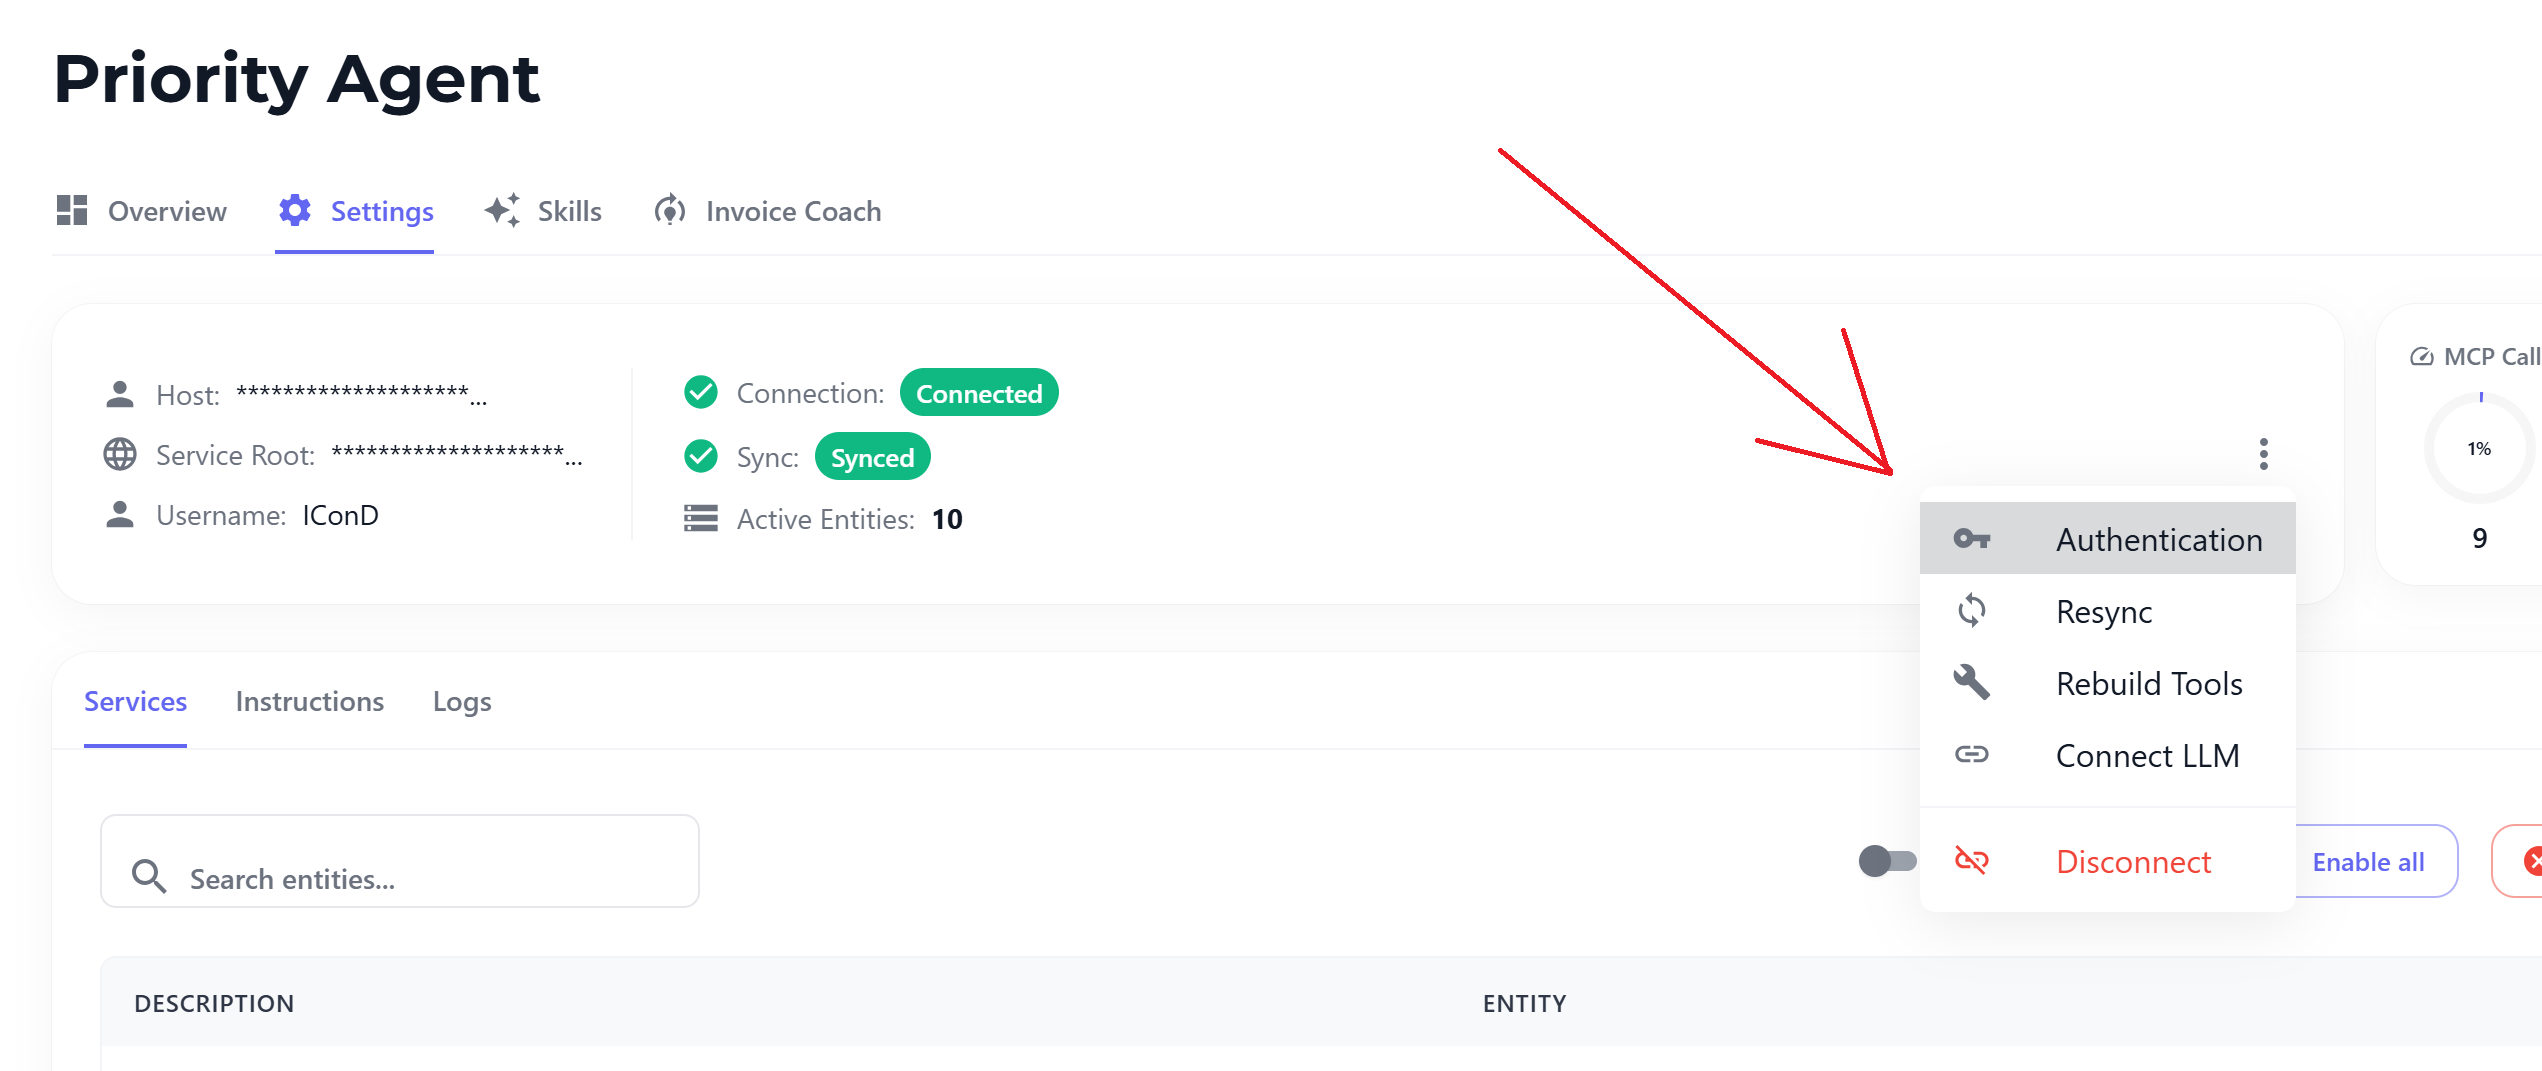
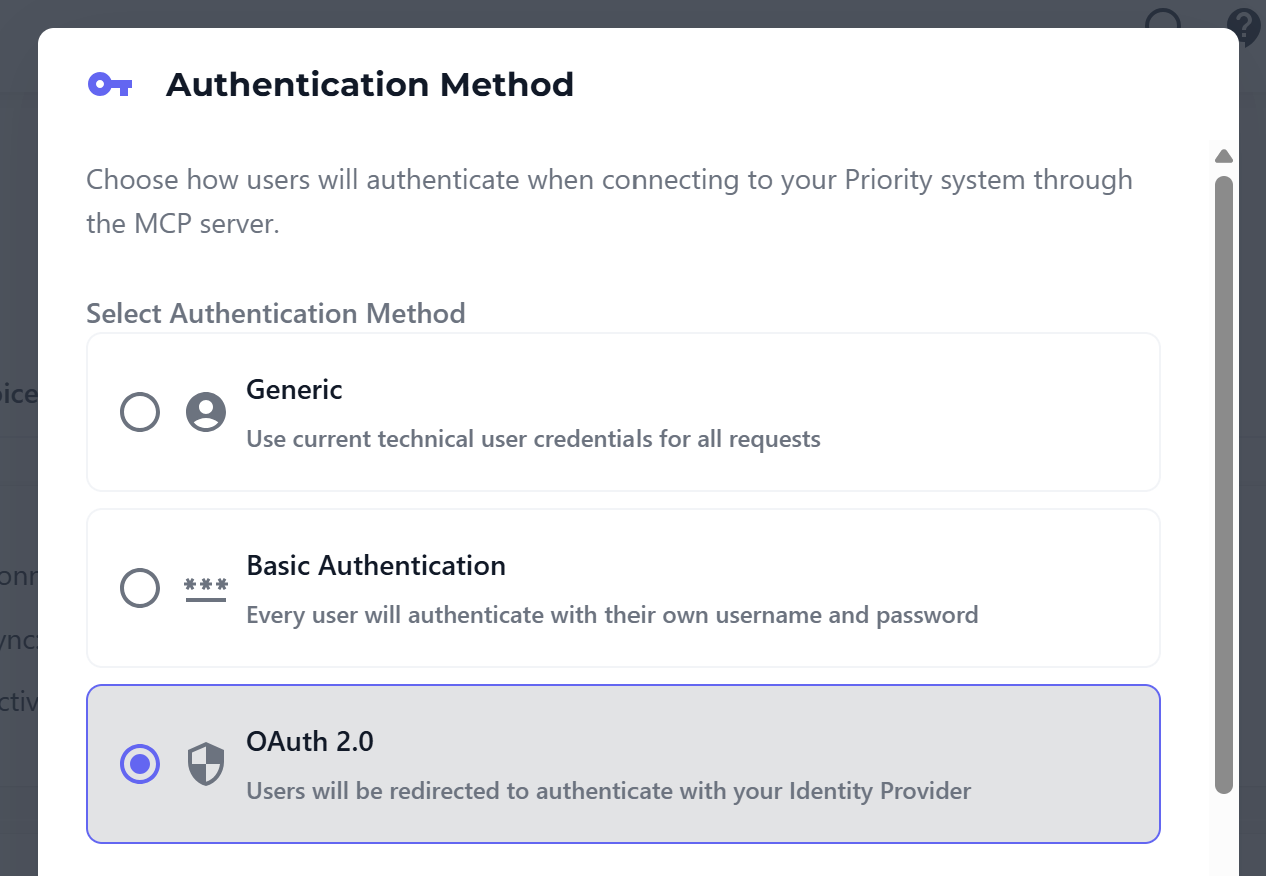
- Select OAuth
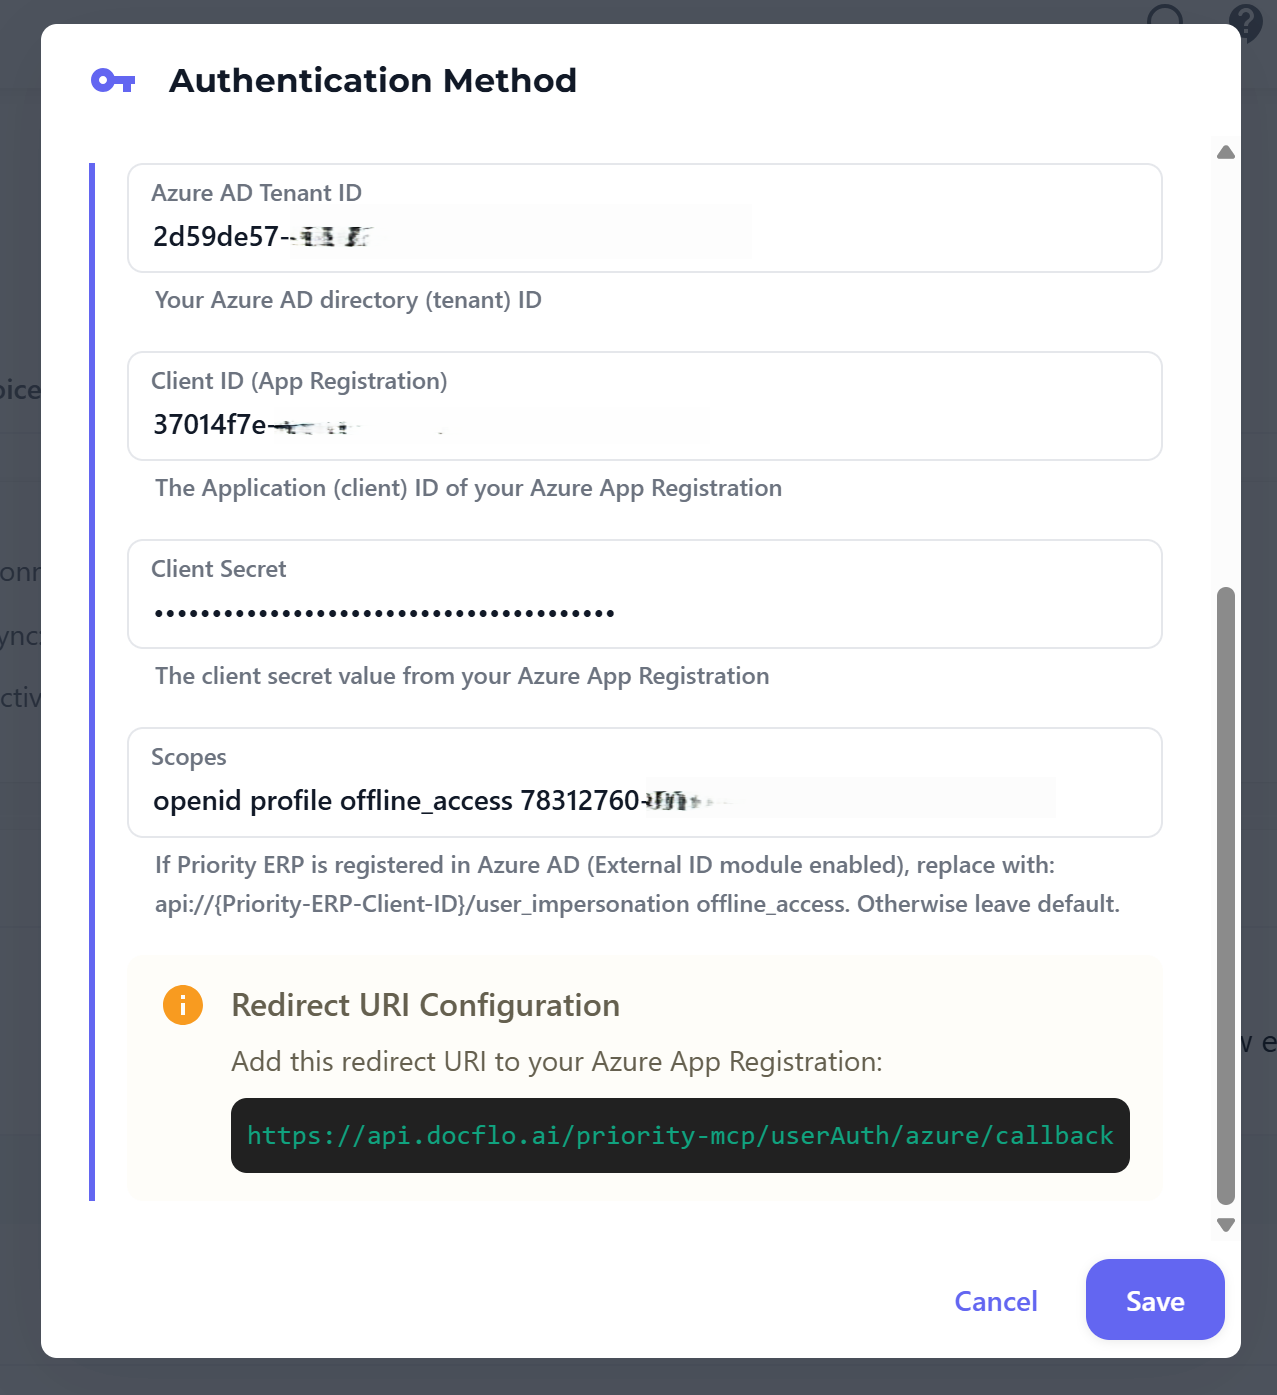
- Set the details, note that "Scope" must include your ERP app client ID
Docflo SSO
Docflo authentication tokens will be used. You must add trust (OIDC) on your end according to following details:
| Setting | Value |
|---|---|
| Issuer | https://docflo.eu.auth0.com/ |
| Client ID | https://docflo-auth-api |
| JWKS | https://docflo.eu.auth0.com/.well-known/jwks.json |
| Audience | https://docflo-auth-api |
We issue a token with an email claim that can be mapped to users on your side.