Outlook Integration Setup
This page explains how to register an application in Microsoft Azure Active Directory (Entra ID) to enable Docflo to read Outlook mailboxes. This process is essential for setting up email extraction from Outlook accounts.
What You'll Get
At the end of this process, you will have the following credentials needed to connect Outlook to Docflo:
- Tenant ID - Your organization's unique identifier in Azure
- Client ID - The unique identifier for your registered application
- Client Secret - The authentication key for your application
Prerequisites
- Administrative access to your organization's Microsoft Azure/Entra ID
- Permissions to register applications and grant admin consent
Step-by-Step Setup Process
Step 1: Get Your Tenant ID
- Navigate to the Azure portal or Microsoft 365 admin center
- Click on your profile/settings menu in the top right corner
- Note down your Tenant ID from the organization information
Step 2: Register Your Application
-
Follow the official Microsoft documentation to register a new application:
📖 How to register an app - Microsoft Learn
Important steps during registration:
- Choose a meaningful name for your application (e.g., "Docflo Email Integration")
- Select the appropriate account types (typically "Accounts in this organizational directory only")
- Note down the Application (Client) ID once the app is created
- Don't forget to grant admin consent for the required permissions
Step 3: Create a Client Secret
-
After registering your application, you need to create a client secret for authentication:
📖 Add credentials to your application - Microsoft Learn
Key points:
- Choose an appropriate expiration period for the secret
- Copy and securely store the Client Secret value immediately (it won't be shown again)
- Note the secret's expiration date for future renewal
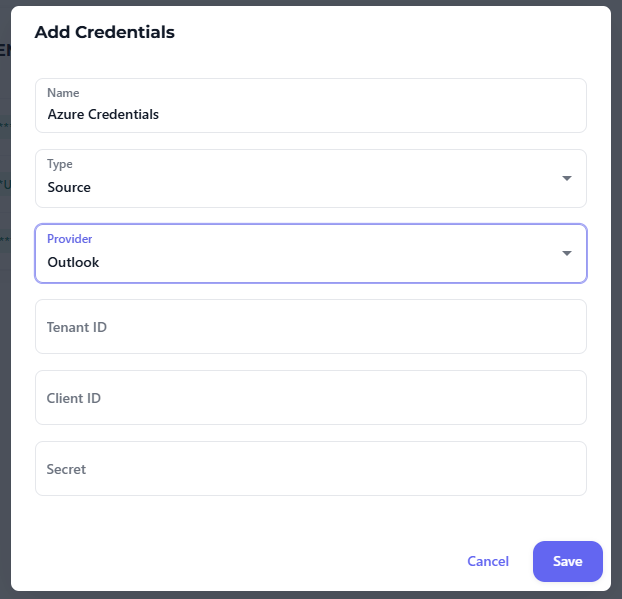
Step 4: Configure Outlook Credentials in Docflo
- Log into your Docflo account
- Navigate to Credentials
- Add a new credential entry with the following information:
- Name: Give it a descriptive name (e.g., "Company Outlook Integration")
- Tenant ID: Enter the tenant ID from Step 1
- Client ID: Enter the application (client) ID from Step 2
- Client Secret: Enter the client secret from Step 3
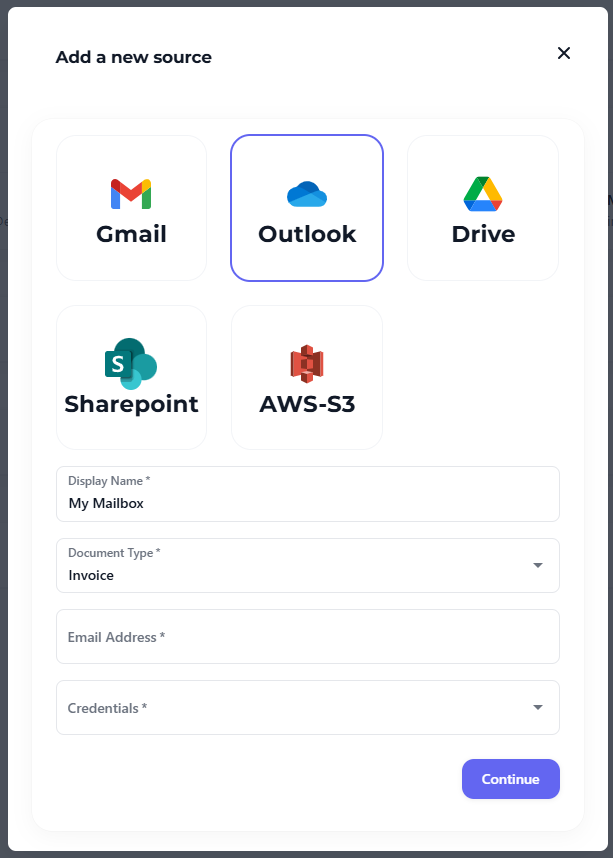
Step 5: Add Outlook Mailbox as Source
- Go to Sources in the Docflo interface
- Click Add New Source
- Select Outlook/Exchange as the source type
- Choose the credentials you created in Step 4
- Enter the specific mailbox address you wish to connect to Docflo
Important Security Notes
- Keep your Client Secret secure - treat it like a password
- Set appropriate expiration dates for your client secrets
- Regularly rotate secrets before they expire
- Use principle of least privilege - only grant necessary permissions
- Monitor application usage through Azure logs
Troubleshooting
If you encounter issues:
- Authentication failures: Verify all credentials are entered correctly
- Permission denied: Ensure admin consent has been granted
- Expired secrets: Check if your client secret needs renewal
- Mailbox access issues: Confirm the specified mailbox exists and is accessible
Next Steps
Once your Outlook integration is set up, you can:
- Set up approval workflows
- Monitor email ingestion through logs and document lists
For additional support with Outlook integration, contact your Docflo administrator or support team.